Piro2 - Blog
Oct 23rd, 2017 - Hardware progress
Sorry for taking so long between the blog posts, but I got interested in a new project during the summer. I built a PiKON 3D-printed telescope. I created web pages at Pate's PiKon Telescope for that project. It was an interestign project, especially since I was able to use many of the parts from my old Piro robot in this telescope. I used the Raspberry Pi 2, the L298N motor controller, and the 400rpm wheel motors (for altitude and azimuth control), all from my Piro robot project. It took me a couple of months to make the telescope (or actually the motorized base for it), so I only recently got back to working on Piro 2.
Finger modeling
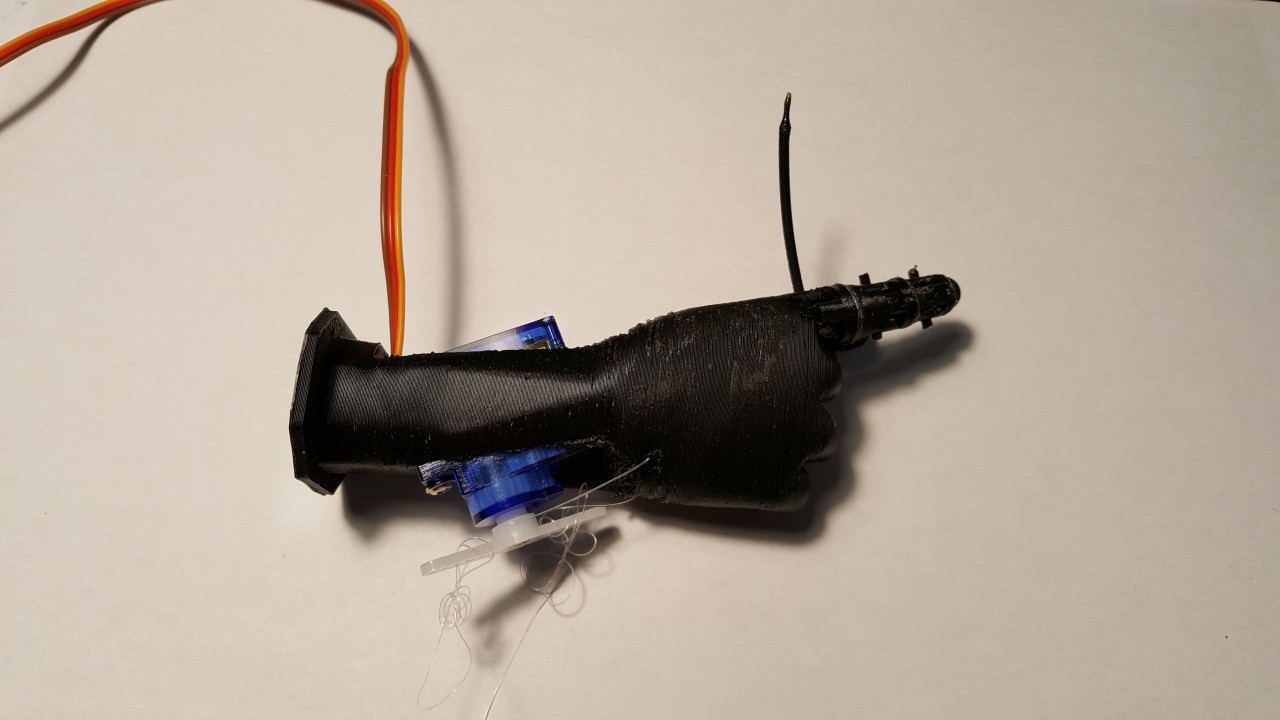
Before I worked on my PiKON telescope, I had worked on modeling the index finger for Piro 2. I took a lot of ideas from the InMoov Finger Starter guide. For example, the InMoov guide uses 3mm 3D-printing filament as the finger joint axis, I decided to use 1.75mm filament, as that is the type of filament my printer uses. It also works better scale-wise, as my robot is much smaller than the InMoov robot. I did use the same idea of printing each finger "bone" in two parts, and glueing them together. This seemed to work quite fine, but the problem was the size of the SG90 servo I planned to use for moving the index finger. No matter how I tried to place the servo into the hand, wrist, or lower arm, it always protruded rather unattractively out of the model. Here below is a test print with the servo in the wrist.
New nano servos for finger movement
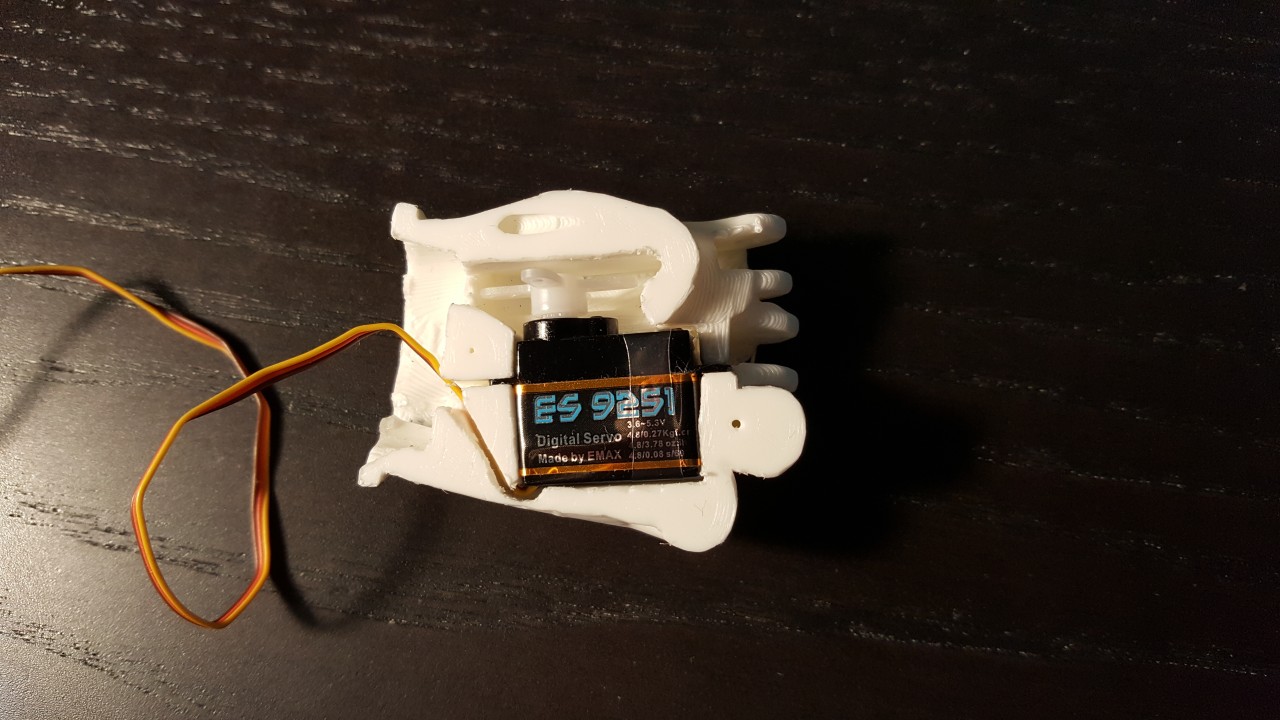
In the beginning of September, while i was still mainly working on my PiKON telescope, I started looking for smaller servos to use for the index finger movement. After surfing the net, I found a local online shop Vertical Hobby that sells 2.5g Emax ES9251 servos for a reasonable price. I decided to buy two of these, one for each hand. I ordered them on September 9th, which was a Saturday. The servos were sent the next Monday, and arrived that Wednesday, so quite a bit faster than when ordering servos all the way from China!
After the servos arrived, I realized they are so small that I could actually fit them completely inside the hand! This made me then think about using more than one of these nano servos for each hand. I contemplated using one servo to turn the wrist, and another to move the index finger. Or, perhaps I could use one servo for the index finger, and another to move the thumb, for a proper pincer action. In the end, I decided to go for three finger movement, with the index finger servo inside the hand, and the other two servos in the wrist.
Here is an image of how snuggly the servo fits inside the hand of my robot.
Adafruit 16-channel servo controller
When I decided to go for the full three finger movement, I realized I will need to control eight servos for each hand! That would use up 16 GPIO channels of the Raspberry Pi, so i would not be able to attach much else. That did not sound very good, so I thought I'd check what sort of servo controllers that work with a Raspberry Pi are available.
Pretty soon I found Adafruit 16-Channel PWM/Servo HAT for Raspberry Pi, which seemed to have all the features I needed, so I decided to order it from another local online shop, Robomaa.fi. I also purchased some additional headers, as I wanted to still use all the available GPIO ports of my Raspberry Pi, in addition to these 16 servos that this controller will drive. The hat came with none of the headers soldered, so it took me a couple of evenings to very carefully solder the headers.
The hat even has an area of solder points that are freely usable for prototyping, so I decided to add one row of headers that are connected to the servo 5V input. This way I can use these headers to power the small loudspeaker amplifier, and possibly other additional devices in the future. I also connected the 3.3V, 5.0V and GND headers near this area, to power the HR-SC04 distance sensor and the MPU-6050 IMU that is inside the head of my robot. All in all, this was a very useful addition to my robot in several ways:
- It practically frees up 16 GPIO channels from my Raspberry Pi.
- It still allows almost all the GPIO channels to pass thru, so I only lose one GPIO channel (GPIO#26) while gaining those 16 PWM channels.
- The pass-thru GPIO pins are labeled, so no more looking at the pin guide and trying to count the pins in the GPIO header!
- I can distribute power for all the additional devices from the servo hat, with two options of 5 volts (from Raspberry Pi or from the servo power), and the 3.3 volts from the Raspberry Pi.
In the image below I have connected the MPU-6050 to the I2C SDA and SCL lines (and also to the 3.3V and ground lines), the HR-SC04 to the GPIO#4 and GPIO#17 pins (and also to the 5V and ground lines), the head servos to the GPIO#20 and GPIO#21 lines (and als to the ServoHat 5V and ground lines), the loudspeaker to the ServoHat 5V and ground lines, and finally the two old Futaba servos (using those twisted red-black-white cables) to the first two Servohat servo connectors.

Hand modeling
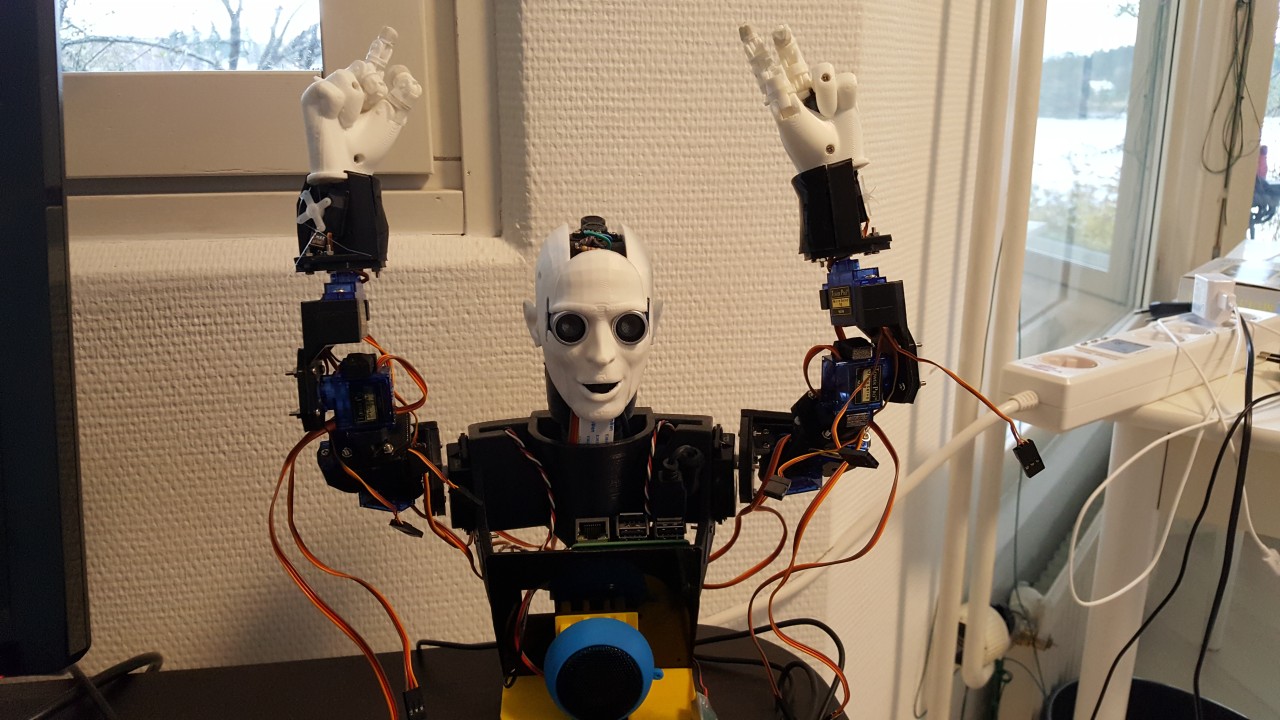
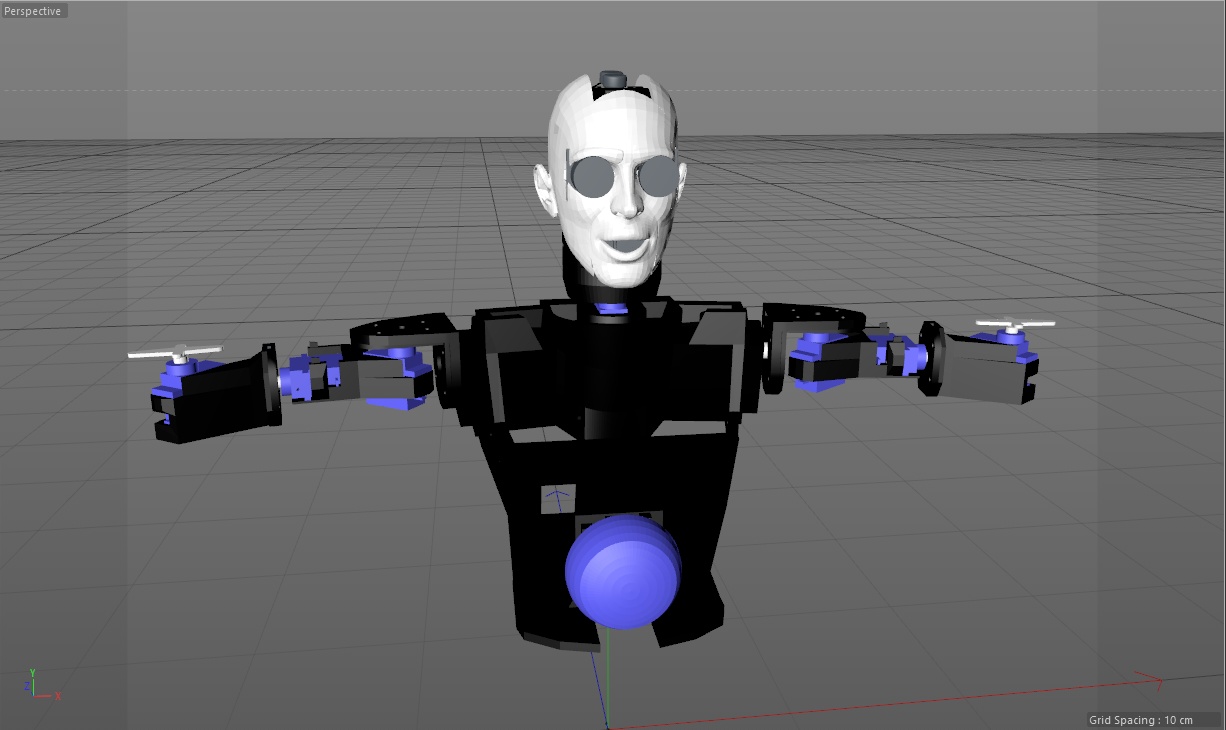
My original plan was to give my robot black hands, same as in the animation movie where my pilot model is from. However, it occurred to me, that perhaps white hands would like nicer. Since the head of the robot is white, white hands would suit that well. Also, if I plan to have the camera track the hands (so that Piro2 would see where it�'s hands are), white hands might be easier to track than black hands. So, I printed the finger parts and hand parts using white PLA filament.
I took some video when I printed the fingers and the hand parts, and also when I assembled the fingers. I added some screen capture video from my working on Cinema 4D and KISSlicer, and edited all these clips together to a new video, illustrating how I created the hands for my robot. The video is rather long, and possibly also rather boring, so only recommended for those interested in creating something similar. :)
It took me a while to get the video edited, as I also kept working on Piro2 during this time. I modeled and printed the wrist parts containing the thumb and middle finger servos, and also printed the mirrored parts for the left hand. After that I was finally able to completely assemble the hands! I used this image also as the title image of my hand creation video, even though the video does not actually contain the final assembly. I still need to add some wire extensions to connect the outside servos to the servo connector, and then I can move on to software development! I need to create some sort of Inverse Kinematics rig to move the hands, so that will probably be the next step.
June 5th, 2017 - 3D-modeling the upper arms for Piro2
During the past couple of weeks, I have switched my focus from software to hardware. I began figuring out how to model the arms for my robot, and then started modeling the actual parts. Each part took several days for me to model, as there are so many things to take into account when modeling. Firstly, I need to have a clear idea as to the orientation I plan to print the parts in. This affects the shape of the part, as I try to avoid the need for support structures. Then, I need to figure out a way to attach the servos to the parts. It is easy to model the part around the servo, but the challenge comes from figuring out a way to actually insert the servo into the part. Also, there needs to be room for the servo cable. Then, I need to figure out the required clearances for the movement of the arm, so that the servos can rotate freely. All this takes time, and usually several attempts, to get right.
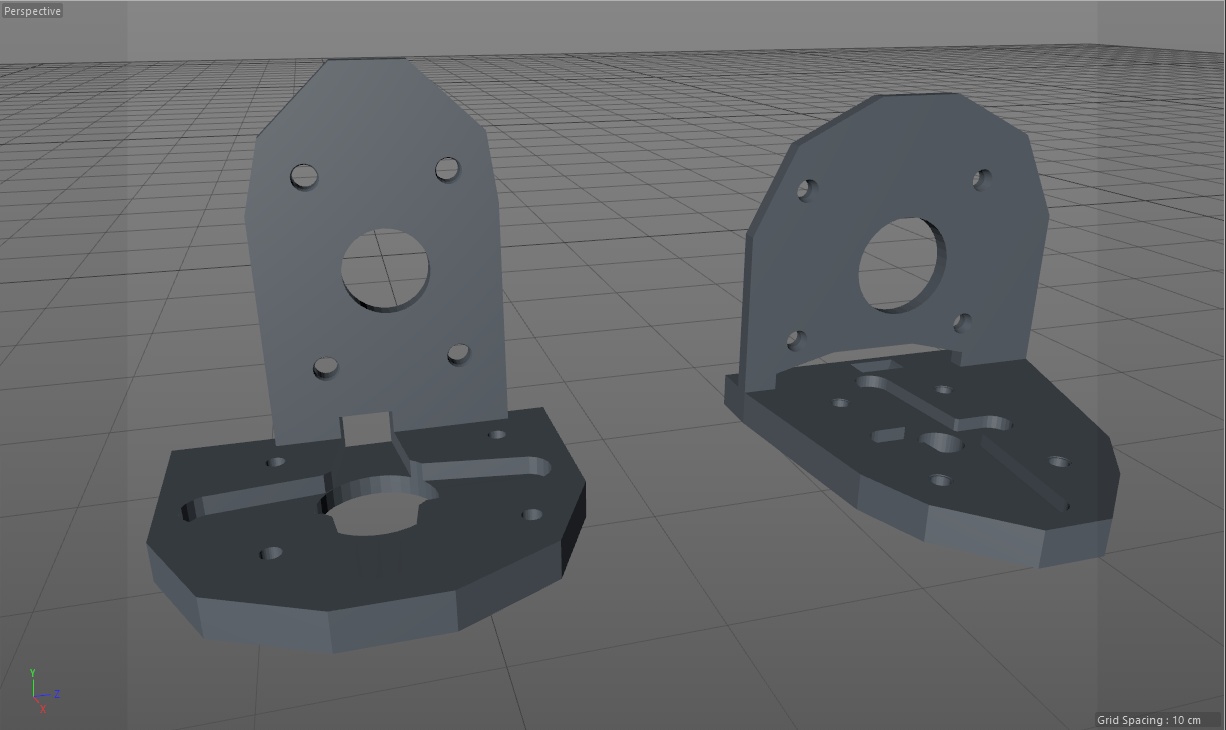
I first modeled and printed the L-shaped parts that connect the shoulder servos (I am using my old Futaba FP-S23 servos back from 1981 for these) within the body of the robot to the arm servos (which are new Tower Pro SG90 micro servos from China). My first attempt at modeling these used three separate parts; one L-shaped part, and then two plates that sandwitched each of the servo arms between the L-part and the corresponding plate. Then I decided, that using just two 3D-printed parts would probably make the whole joint stronger. Thus, I redesigned the part so, that the parts slot into each other, while also sandwitching the servo arms into their grooves. I am using M2 nuts and bolts to attach the two parts of the L-joint together.
Next, I modeled the whole upper arm. At first, I thought I would just use a straight 3D-printed part, with a servo at each end. After modeling and printing this part, I realized, that this would not give me sufficient degrees of freedom for the arm movement. After measuring the part, I saw that there will be enough room between the shoulder and elbow servos to add a third servo that rotates the elbow. Thus, I remodeled the upper arm section using a third servo. This turned out fine, and I got all the required degrees of freedom for my robot arm down to the elbow.
After I got the internal structure modeled, I looked into adding a white decorative cover over the arm (as I have in my original character model from my 2003 animation project Snow Fall), I realized I needed to also model the decorative part at this point, and figure out a way to attach all these parts together. Modeling the cover necessitated still some additional changes to my internal parts. In the end I managed to design and print all the parts, and the result does work, but is not quite as pretty as I had hoped. I will probably still revisit the models, but I plan to next work on the lower arm, from the elbow down.
I also spent some time creating a video that somewhat describes this 3D-printing process I use. It shows my 3D model in Cinema 4D, then the slicing of the model using KISSlicer, and then finally printing the parts on my Kossel XL printer. The video is more of an overview of my workflow, so it does not give very detailed information. I am still just learning the best practices for 3D-printing myself.
As I mentioned, next step is to model the lower arm, from the elbow down. I also plan to have the fingers working at least in some fashion. My current plan is to look into having one servo handle the fingers so that turning the servo one way will generate a grabbing finger movement, and other way would generate a pointing gesture using the index finger. I think that would be sufficient dexterity for my simple robot model, but I am not even sure I can get that system working. We shall see. :-)
May 14th, 2017 - NLU work continues
Happy Mother's Day! For the past couple of weeks I have been continuing my work with the Natural Language Understanding features of Piro2. After I got the verb "look" to work, I began thinking about how to expand the system to handle other verbs and more complex sentences. I added an alternative method of turning the head, so that instead of "look right" I can also say "turn your head right". However, this felt like such a simple enhancement, that I wanted to try something a bit more complex.
Since I had already implemented a simple memory system (to be able to answer "where have you looked?" -questions), I thought that perhaps it would be a good idea to enhance the system with time stamps. That would allow me to handle a new question word "when", as in "When did you look left?". It also occurred to me, that an action scheduler for Piro2 is something that I will eventually need in any case, so I decided to work on that. This will allow me to schedule various future actions, like "Turn your head right after five seconds".
I enhanced my link-grammar parsing routines to handle prepositional phrases with "in", "after" and "for". The prepositional phrases like "in four seconds" or "for six seconds" have similar link-grammar structure, they are connected to the word they modify using the "MVp" link, the preposition is followed by it's object ("seconds") connected by the "Jp" link, and the object noun has the number of seconds as a determiner.
                            +-----------MVp-----------+
             +----Os---+    |      +-----Jp----+      +----Jp----+
    +---Wi---+     +D*u+-Ma-+--MVp-+    +--Dmc-+      |   +--Dmc-+
    |        |     |   |    |      |    |      |      |   |      |
LEFT-WALL turn.v your NN right.a for.p six seconds.n in four seconds.n


NOUN table:
idx=3 (head), role=O, pp_tag=0
 - Determiner=2 (your)
 - Adjectives: 4 (right)
idx=7 (seconds), role=J, pp_tag=0
 - Determiner=6 (six)
idx=10 (seconds), role=J, pp_tag=0
 - Determiner=9 (four)
VERB table:
idx=1 (turn), modal=0, tense=1, neg=1
 - Object: 3 (head)
PREP table:
idx=8 (in)
 - Modifies word 4 (right)
 - Object 10 (seconds)
idx=5 (for)
 - Modifies word 4 (right)
 - Object 7 (seconds)
I added a generic routine to parse such time expressions into my main NLU parsing routines, which then allowed me to use these time expressions when scheduling the head turning actions. I again created a short video demonstrating these new abilities of my robot.
Next I plan to add support for some new verbs and actions. I am thinking of adding some camera operations to the mix, but I haven't yet decided what sort of operations I will first work on. I would also like to get back to working on the mechanical design of the robot for a while. I would like to design and print the upper arms next, but I will need to figure out where to locate the servos within the arms. A third option would be to work on some internet connectivity, so that the robot could tell me the latest news headlines or current temperatures or something like that, for example. There are lots of possibilities, I'll need to think about what would be the most interesting thing to implement first.
Apr 23rd, 2017 - NLU work continues
I have been on an Easter vacation this past week, so I have managed to work on Piro2 a couple of hours almost every day. I have been continuing my work on the natural language understanding features. For the past couple of days I have been working on the sentence handlers for the verb "look", so that I can ask questions and give commands with sentences containing that verb. Piro2 can move it's head to look at the given direction, and it can also let me know where it is currently looking, or where it has recently looked.
Yesterday I switched to using the JSGF grammar on Pocket Sphinx speech recognition, as that will considerably improve the recognition accuracy. It only needs to decide between given sentences when using the grammar, instead of trying to recognize every single word in the vocabulary. This worked so well, that today I decided to try and capture a video of me speaking simple sentences with the word "look" in them, and Piro2 then parsing the sentences and either replying to questions or turning it's head as required.
The image quality of the video is not all that great, as I did not have enough room on the small table to put my cell phone close to my robot, so I took the video a bit further away and used some zoom. I hope to figure out a better quality solution for future videos. Anyways, the video is otherwise unedited, except that I added some subtitles in case you have trouble understanding my or my robot's English. The speech recognition stil has trouble deciding whether I said "left" or "right", but other than that issue, the robot understood me surprisingly well.
I had also added small head nod and head shake for yes and no answers that the robot gives, to make the robot look a bit more interactive. I still need to make the head turning more human-like by smoothing the servo curves, but I am currently more interested in continuing my work on the speech understanding.
Apr 16th, 2017 - Natural Language Understanding
After the last blog post I again took a bit of a break from working on Piro2. I had somewhat lost my motivation for working on the project, as I had gotten quite frustrated with the poor speech recognition accuracy. My goal is to be able to converse with my robot, and that is pretty useless if the robot does not understand me at all. I had been testing various ways to improve the accuracy, but the only thing that considerably improved the accuracy was to switch to a list of predetermined commands or sentences, and that limits the whole idea quite seriously.
However, after reading Perilous Waif by E. William Brown, I again got motivated to continue working on my robot. That book has quite fun and interesting interactions between androids and humans (along with other interesting ideas), so it is recommended reading for all science fiction fans. I decided to forget the speech recognition problems for now, instead focusing on what happens after I have managed to capture a sentence of speech. I created a very simple text chat interface for my robot, so that I can type a sentence, and the robot code can then try to parse and understand that sentence.
Link-grammar integration
By the end of last year I had managed to create a simple link-grammar dictionary, but I had not yet managed to integrate link-grammar into my Piro2 project. In the beginning of March I worked on this integration, and managed to get the link-grammar code to compile with my Piro2 sources. In the end I only needed to make changes to two link-grammar source modules:
- In module tokenize.c I created a new routine piro_separate_sentence(), which behaves like the original separate_sentence() routine, except that instead of a string input, it gets as input a word array and a POS tag array corresponding to the input sentence. This routine then looks up either the word, or the POS tag from the link-grammar dictionary, for each of the original input sentence words.
- In the api.c module I created a piro_sentence_create() routine, which uses the above piro_separate_sentence(), similarly to how the original sentence_create() API call used the original separate_sentence() routine, and returns the link-grammar Sentence structure.
From link-grammar to what?
Next, I spent several days trying to figure out how to utilize the link-grammar parse graph for actual natural language understanding (NLU). After a week or so of not getting any progress done, I decided to just start coding something, the idea being to get a better understanding of the link-grammar graph structures. I began creating specific routines for specific link-grammar link orders, for example a simple sentence "I see" generates links RW, Wd and S, so I created a routine called RW_Wd_S() to handle such simple subject + verb sentences. I soon realized that it might be a good idea to handle all tense forms of the verb of such short sentences in the same routine, so I used the British Council pages as a reference for all the tense forms:
| Form | Link-grammar | Tense |
|---|---|---|
| I see | RW_Wd_S | present simple |
| I am seeing | RW_Wd_S_P | present continuous |
| I have seen | RW_Wd_S_PP | present perfect |
| I have been seeing | RW_Wd_S_PP_P | present perfect continuous |
| I saw | RW_Wd_S | past simple |
| I was seeing | RW_Wd_S_P | past continuous |
| I had seen | RW_Wd_S_PP | past perfect |
| I had been seeing | RW_Wd_S_PP_P | past perfect continuous |
I also decided that the negative forms (like "I did not see", "I haven't been seeing") might be good to handle in the same routines as well. I spent a week or so coding such routines, but then ran into a problem when the sentences became more complex. Since my routines did not check the link targets, only the link labels, the exact same link labels in the same order could be generated from two quite different sentences. I decided, that this was not the correct way to handle the link-grammar results, and went back to the drawing board, so to speak.
In the beginning of April I decided to start working on a system where I just build a list of all the nouns and verbs that link-grammar encounters, along with a list of adjectives and prepositions. Each verb has a link to the subject noun, and up to two object nouns, together with the tense and negation of the verb, and possible modal or auxiliary verb connected to the verb. Each noun has a link to it's determiner(s). Each adjective has a target link (to a noun or a verb that it modifies), and a list of adverbs that modify this adjective. The preposition list is a collection of pretty much all the other parts of the sentence, with links to whatever word the preposition modifies.
After a few days working on this new system, I was able to build the internal noun/verb/etc structures for most of the sentences I found from the random list of sentences at http://www.englishinuse.net/. Sentences with commas are still a problem, but on the other hand, there are no commas in the spoken (speech recognized) language, so I will need to handle such sentences in some other way in any case.
Database of concepts
For the past couple of days I have been working on the next step of the natural language understanding. I began to use an SQLite database in Piro2, and created a few tables that would contain entities, properties and instances of entities that Piro2 would have knowledge of. Getting SQLite to work on a Raspberry Pi is pretty simple, I just needed to do these simple steps:
sudo apt-get install sqlite3
sudo apt-get install libsqlite3-dev
sqlite3 piro2.db
I added a couple of entities, "human" and "robot" to the database, both with a single instance. Both of those entities has a "name" property, so that Piro2 now has a database that contains a "human" instance with a name "Patrick", and a "robot" instance with a name "Piro". I also added the basis of self-awareness by making my code understand that the "robot" instance named "Piro" means itself.
My simple chat interface can already handle questions like "Who are you?" ("My name is Piro.") and "What are you?" ("I am a robot."). For fun, I also used a list from http://hello.faqcow.com/howareyou100.html to give a random reply for the "How are you?" question. Here below is an example of the current output (including various debug prints) for a "how are you" question:
how are you
s = 'LEFT-WALL'
s = 'how'
s = 'are'
s = 'you'
s = 'RIGHT-WALL'

    +--Wq--+AFh+SIp+
    |      |   |   |
LEFT-WALL how are you


RW
Wq
Found Wq: Where/When/Why/Object/Adjectival question.
AFh
SIpx
Category=10
NOUN table:
idx=3 (you), role=S, pp_tag=27
 - Adjectives:
VERB table:
idx=2 (are), modal=0, tense=1, neg=1
 - Subject: 3 (you)
 - Adjectives: 1 (how)
PREP table:
Handling 'how' question...
Handling 'how be' question...
I am feeling happier than ever!
I think I will code a specific handler for each verb that Piro2 should understand, so that it can then reply to questions like "Can you hear me?" or "What do you see?". It can already handle various questions using the verb "be" (in addition to those mentioned above), like for example "Is your name Piro?" ("Yes, my name is Piro.") or "Are you a human?" ("No, I am a robot.").
The next steps are to enhance both the code and the database with new properties and handlers for new verbs. It is possible that I still need to change my approach to natural language understanding, but for now I will continue with this approach. At some point I will again activate the speech recognition, and check what happens when I try to speak these questions and let Piro2 then speak the replies. If I get that working, it might even be worth taking a video of.
Jan 29th, 2017 - Piro2 work continues after a short hiatus
For the past couple of weeks I have been distracted by some other projects and issues, and thus have not been working on Piro2 for a while now. One of the issues was that I had a couple of hard disk failures in my NAS server machine. First one of my oldest 80GB hard disks that I had used as a RAID0 pair broke down, which meant I lost all data I had on both of those disks. Luckily I had used this disk only for storing some temporary files, so I did not lose anything important. However, just a week after that, I lost another disk, this time a terabyte disk on a RAID1 array. Strangely, the disk that broke down was the newest of all my disks, but even it was almost three years old. Of course it had only a two-year warranty. I had to purchase a new terabyte disk and rebuild the RAID1 array. Luckily all of that went fine and I did not lose any data while replacing the disk.
Anyways, now that I am back working on Piro2, the first step was to see what happens if I try to increase the face detection image size from 320x240 up to 1280x720. This turned out to be a rather simple change, I just needed to adjust some hard-coded values in my ASM routines so that it handled this size properly. The Haar cascade face detection builds a cascade of different scale images that it uses for the detection, and increasing the image size increased the number of these scaled images to 36. With the original 320x240 image size the algorithm used around 20 scaled images. The increased size and number of images dropped the face detection rate to around one frame per second.
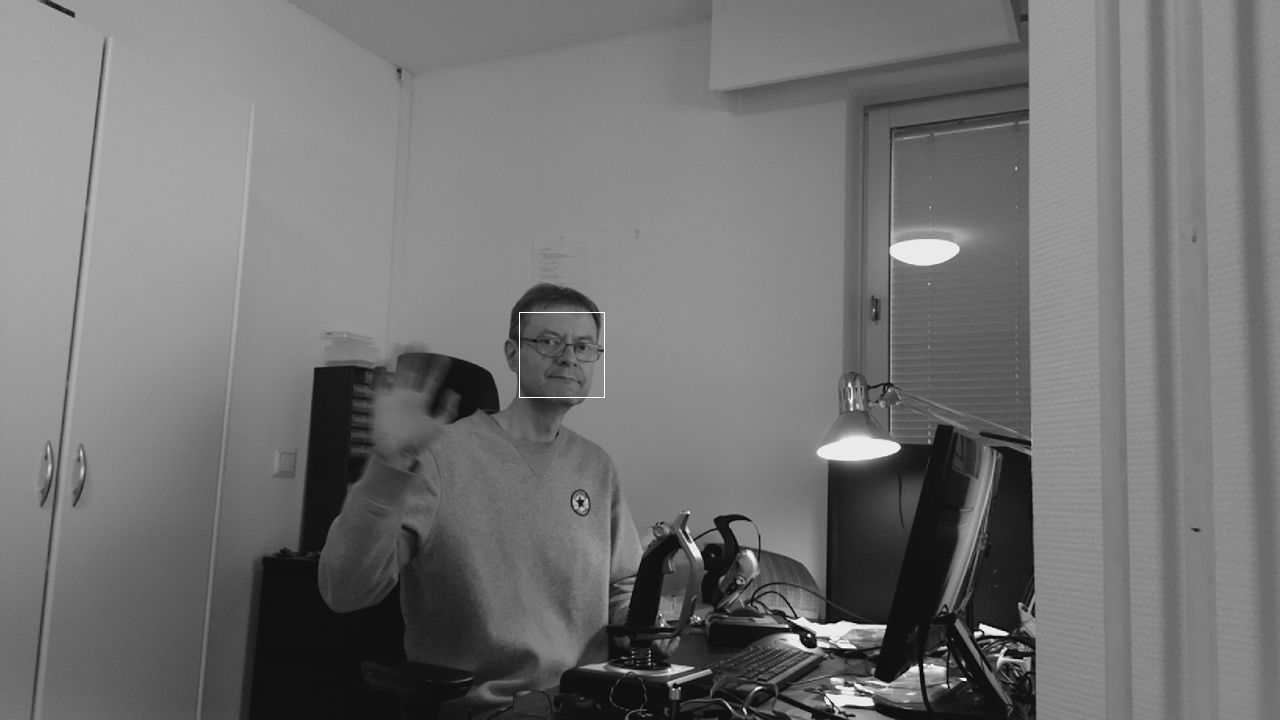
I am thinking of using motion detection to try to limit the areas of the image where face detection would be useful, so I next began working on a motion detection algorithm. In principle this is pretty simple, I just need to compare two images taken at different times, and detect the pixels that have changed. This was also a nice routine to attempt to use NEON ASM code, and I even learned about a couple of new NEON ASM operations that I had not used before. I thought that the motion detection image does not need to have the full 1280x720 resolution, so I decided to go down to 160x90 resolution for the motion detection image:
The way my motion detection algorithm currently works, is by always storing a smoothed 640x360 image together with the original 1280x720 camera capture image, at 30 frames per second. Then at around one frame per second (as it is currently connected to the face detection routine) I compare the latest 640x360 image that is further smoothed down to 160x90, with the 640x360 image (again smoothed down to 160x90) from the previous motion detection step, which currently means about one second ago. There is still a lot of room for improvement, for example, it is unnecessary to re-smooth the previous image again when comparing the images. I did that just because it made the algorithm simpler, and I can easily test different ways of smoothing the image. This is still very much a work in progress.
Here below is the full motion detection image calculation ASM routine. The interesting NEON ASM operations that I use are:
- vrhadd, which adds corresponding elements in two vectors, shifts each result right one bit and stores the results in the destination vector. In other words, this opcode calculates the average of the pixel values in the given NEON registers.
- vpaddl, which adds adjacent pairs of elements of a vector, sign or zero extends the results to twice their original width and stores the results in the destination vector. As I am using u8 as the datatype, it zero-extends the pixel values to 16-bit values.
- vpadd, which adds adjacent pairs of elements of two vectors, and stores the results in the destination vector. This is pretty similar to vpaddl, except that the size of the elements stays the same, in my case 16-bit values.
- vqrshrun, which right shifts each element in a quadword vector of integers by an immediate value, and stores the results in a doubleword vector. This means that it returns my 16-bit pixel values back to 8-bit pixels, while calculating the average of four adjacent pixels that I had summed up using the vpaddl and vpadd operations.
- vabd, which subtracts the elements of one vector from the corresponding elements of another and places the absolute values of the results into the elements of the destination vector. This gives the actual difference between the images.
//------------------------ motion_detect ------------------------
//
// Input:
//	r0 = pointer to output motion detection map (160x90)
// 	r1 = pointer to new imgbuffer (640x360)
// 	r2 = pointer to previous imgbuffer (640x360)
//
motion_detect:
	pld		[r1]
	pld		[r2]
	push   		{r4-r11, lr}
	vpush		{d8-d23}
	vpush		{d24-d31}
	add		r3, r1, #640
	add		r4, r2, #640
	add		r5, r1, #2*640
	add		r6, r2, #2*640
	add		r7, r1, #3*640
	add		r8, r1, #3*640
	mov		r9, #360				// r9 = Y loop counter
1:	mov		r10, #640				// r10 = X loop counter
2:	vldmia		r1!, {d0-d3}				// Load 32 pixels from new imgbuffer first row
	vldmia		r2!, {d4-d7}				// Load 32 pixels from previous imgbuffer first row
	vldmia		r3!, {d8-d11}				// Load 32 pixels from new imgbuffer second row
	vldmia		r4!, {d12-d15}				// Load 32 pixels from previous imgbuffer second row
	vldmia		r5!, {d16-d19}				// Load 32 pixels from new imgbuffer third row
	vldmia		r6!, {d20-d23}				// Load 32 pixels from previous imgbuffer third row
	vldmia		r7!, {d24-d27}				// Load 32 pixels from new imgbuffer fourth row
	vldmia		r8!, {d28-d31}				// Load 32 pixels from previous imgbuffer fourth row
	pld		[r1]
	pld		[r2]
	pld		[r3]
	pld		[r4]
	pld		[r5]
	pld		[r6]
	pld		[r7]
	pld		[r8]
	//-----
	// Average the four rows of pixels together, new imgbuffer
	//-----
	vrhadd.u8	q0, q4
	vrhadd.u8	q1, q5
	vrhadd.u8	q8, q12
	vrhadd.u8	q9, q13
	vrhadd.u8	q0, q8
	vrhadd.u8	q1, q9
	//-----
	// Average the four rows of pixels together, previous imgbuffer
	//-----
	vrhadd.u8	q2, q6
	vrhadd.u8	q3, q7
	vrhadd.u8	q10, q14
	vrhadd.u8	q11, q15
	vrhadd.u8	q2, q10
	vrhadd.u8	q3, q11
	//-----
	// Average the four adjacent pixels together, new imgbuffer
	//-----
	vpaddl.u8	q0, q0
	vpaddl.u8	q1, q1
	vpadd.i16	d0, d0, d1
	vpadd.i16	d1, d2, d3
	vqrshrun.s16	d0, q0, #2
	//-----
	// Average the four adjacent pixels together, previous imgbuffer
	//-----
	vpaddl.u8	q2, q2
	vpaddl.u8	q3, q3
	vpadd.i16	d4, d4, d5
	vpadd.i16	d5, d6, d7
	vqrshrun.s16	d2, q2, #2
	//-----
	// Calculate and store the difference between new imgbuffer and previous imgbuffer
	//-----
	subs		r10, #32
	vabd.u8		d0, d2
	vstmia		r0!, {s0,s1}				// Save the resulting 8 pixels to the target.
	bgt		2b					// Back to X loop if X loop counter still > 0
	//-----
	// One row done, prepare for the next row
	//-----
	subs		r9, #4
	add		r1, #3*640
	add		r2, #3*640
	add		r3, #3*640
	add		r4, #3*640
	add		r5, #3*640
	add		r6, #3*640
	add		r7, #3*640
	add		r8, #3*640
	bgt		1b					// Back to Y loop if Y loop counter still > 0
	vpop		{d24-d31}
	vpop		{d8-d23}
	pop		{r4-r11, pc}				// Return to caller
I also did some minor hardware work, I attached suitable connectors to the head and neck servos, so that I can use a separate power source for them (and also for the speaker). The next step would be to implement an algorithm that would move the head of my robot based on the motion detection image. The robot should turn to look at whatever movement it detects. This made me think about implementing a sort of "instinct" behavioral layer, so that the robot follows these instincts whenever the higher AI routines do not override the behavior. One such instinct would be to look towards any movement.
Previous blog entries
- See here for blog entries from 2016.